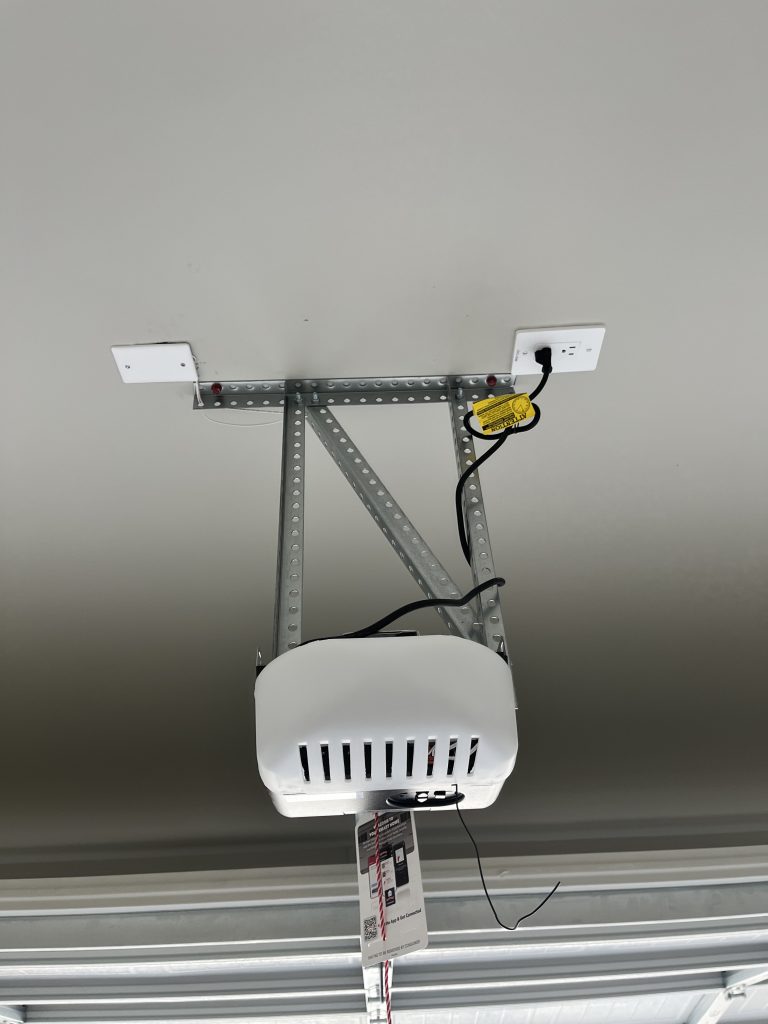
Direct Answer: A garage door opener motor head must be securely anchored to structural ceiling joists using heavy-duty slotted angle iron with diagonal cross-bracing (triangulation). Proper mounting prevents motor vibration, keeps the drive rail perfectly level and aligned with the door header, and eliminates dangerous sway during door operation cycles.
SAFETY WARNING: Garage door systems involve high-tension counterbalances, heavy moving assemblies, and electrical circuits. Never attempt to adjust overhead brackets, spring hardware, or drive assemblies while the opener is powered or under load. Severe structural damage, electrical shock, or fatal blunt-force trauma can occur. Always enlist a certified garage door technician for mounting and mechanical repairs.
Why Proper Garage Door Opener Mounting Matters
When an electric garage door opener operates, it exerts dynamic push-and-pull forces along the drive rail. If the motor unit is mounted using flimsy strapping, inadequate fasteners, or lacks diagonal sway bracing, several structural issues quickly develop:
- Excessive Vibration & Noise: A loose motor amplifies motor humming through the ceiling framing and living spaces above.
- Rail Flex & Gear Stripping: Unstable mounting causes the rail to bow up and down, wearing out the internal drive gears, sprockets, and trolleys prematurely.
- Mounting Hardware Failure: Constant vibration can back out lag screws from ceiling joists, risking a total drop of the heavy motor assembly.
Key Components of a Rigid Opener Mount
1. Structural Joist Anchoring
Mounting brackets must bolt directly into solid ceiling framing (wood rafters, joists, or steel purlins) using lag bolts rated for overhead loads. Fastening exclusively into drywall or plasterboard without structural backing will cause catastrophic failure.
2. Triangulated Angle Iron Framing
As shown in standard professional installations, heavy-gauge perforated angle iron should form a rigid, triangular truss. Vertical drop pieces establish the motor height, while diagonal cross-braces eliminate side-to-side and front-to-back sway.
3. Dedicated Electrical & Clearance Requirements
The motor head requires a dedicated GFCI/standard overhead outlet within 2 to 3 feet of the chassis. Extension cords should never be used as permanent wiring. Ensure proper vertical clearance so the emergency release pull cord remains reachable while hanging at least 6 feet above the garage floor.
Causes vs. Solutions: Opener Vibration & Instability
| Issue / Symptom | Root Cause | Professional Solution |
|---|---|---|
| Severe motor shaking during travel | Missing diagonal cross-brace (single plane drop bracket) | Install triangulated perforated steel angle braces to stabilize lateral sway. |
| Opener pulling out of the ceiling | Lag screws missed the ceiling joist or stripped out | Install a spanning header across multiple joists and secure with heavy-duty lag bolts. |
| Rail bowing downward when pushing door | Motor hung too high or improper door arm angle | Re-level the motor head and rail assembly parallel to the door travel plane. |
| Intermittent power loss during operation | Loose overhead plug or vibrating outlet box | Inspect and secure the receptacle; secure power cord away from moving trolley parts. |
Troubleshooting Opener Mounting & Stability
- Check for Visual Sway: Watch the motor chassis while the door travels; it should remain rigid with zero lateral wobble.
- Verify Rail Level: Ensure the drive rail sits 1 to 2 inches above the door’s highest point of travel (high-arc point) to minimize mechanical strain.
- Inspect Fasteners: Ensure all lock washers, nylon nuts, and lag bolts holding the angle iron frame remain torqued down tightly.
- Call a Professional: If framing needs to be relocated or retrofitted around finished ceilings and ductwork, consult a trained garage door specialist.